10.30.2010

honeycrisp applesauce.

I've heard rumors that during the fall, some folks like to go pick their own apples. I wish I was one of those people - but I never got around to it this fall and I fell victim to the grocery store fruit in their perfectly stacked, shiny glory. I mean, I'm not proud of it, but when fall is on its way out and you're standing in the produce aisle looking at a stack of rosy-yellow honeycrisps, you have to give yourself a little grace.


The problem comes when those same apples sit on your counter for a few days and you realize you don't have any plans for them and they're a little bumped and bruised from the trip home. It's okay, there's applesauce for that.


Now I normally add applesauce to the Baby Food category - I am not a picky eater, but I am especially choosy when it comes to textures. Anything that doesn't require any chewy at all usually makes me suspicious, that and cold cocktail shrimp. Disgusting. Anything that bounces when you drop it should not be food.


But I was looking at the big picture for this applesauce - cakes, muffins, spiked with cinnamon for breakfast. Certainly there is a place and a time for it, I'm not the type of baker who eagerly swaps out oil for applesauce in hopes of lowering the calorie content, but once frozen, applesauce maintains its baking integrity and applesauce - I won't let you down.


This recipe has no added sugar which is perfect for honeycrisp apples because heck - they already taste like honey. What it does have is a few slips of lemon peel that wiggle their way into the sauce without being too loud, and a couple of sticks of cinnamon that scent it ever so slightly - a few spoonfuls and you'll forget you spent the entire glorious season hunched over your textbooks.


One quick note : don't blend the sauce too long in the processor as I did. The sauce was sort of, je ne sais pas...fluffy. You want to blend it until it's smooth, but not so much that you're whipping it. Also, you can use whatever type of apple you like, but if you choose a more tart variety like Granny Smith, you'll likely need to add sugar to taste.

Honeycrisp Applesauce
Adapted from Smitten Kitchen

4 pounds honeycrisp apples, peeled and cored
4 strips of lemon peel
1/4 teaspoon ground cinnamon or 2 cinnamon sticks
1 cup water

Peel, core and chop your apples into large chunks, about 8 pieces per apple. Put all of the ingredients in a large pot and bring to a boil. Once boiling, reduce it to a simmer and cover the pot. Cook for approximately 30 minutes, or until apples are quite soft.  Remove the the lemon peels (make sure you get them all, once cooked, they are the same color as the apples and easily missed) and the cinnamon sticks if you used them.

Allow the apples to cool completely before blending. I spilled them out onto a cookie sheet and set them on the back porch in the chilly air for about 15 minutes and they were good to go.

Puree in a food processor or blender until smooth.

10.26.2010

red lentil soup with lemon + ny times book review.

After a weekend at the chilly farm, it seemed like a good time to make soup. Seemed. Actually, the night [err, last night] I made this soup was an exceptionally warm night for late October and by the time it was ready I was so hot from standing over the stove that the last thing I wanted to eat was steaming hot soup.


But I did anyway. I did it because once I've committed to a recipe, I have to make it. And when you're on a schedule like mine, you have to get to the kitchen while there's time because before you know it, that time has passed and you're still without soup. You understand.


But really, it's a book I want to tell you about. The Essential New York Times Cookbook, actually. I was fortunate enough to receive a review copy of the cookbook, a copy that I forgot was coming until I picked up the package on the front door step and nearly tore my arm out of socket under the sheer weight of it. It weighs four and a half pounds - a weight that I think is justified considering it contains the best recipes from the NY Times from 1850 until now. Really, four and a half pounds is nothing when you're covering over a century.


This book is an absolute treasure. There are no pictures and for the first time in my obsession with glossy-paged, technicolor cookbooks, I didn't care. Page after page after page of interesting, classic, popular and timeless recipes fill this book and I skimmed every single one. You know, for you, to give an accurate report, not because I'm already obsessed with it or anything. There are so many things I want to try - a new twist on hot chocolate with melted chocolate and cocoa powder; the Zuni Cafe Roasted Chicken and Bread Salad that I've seen bouncing all around the Internet but have never tried; whimsical dishes like Browned Butter Rice Crispy Treats and classic throwbacks like Rum Balls and Green Goddess salad dressing. There is no shortage of ideas here - and even though some of the dishes might make you raise an eyebrow [particularly those from before 1900, I don't think I could ever get on board with aspics], it's fascinating to examine ingredients and recipes and lifestyles from back in the day.

Amanda Hesser, the author and a longtime food writer at the Times, organizes the recipe according to date with notes containing menu suggestions and quips about the original recipes which is especially helpful for those of us who are spastic about planning dinner menus and always ending up serving roasted chicken and potatoes. [Cough, me, cough.]


This soup was not an easy pick to start off the book. I considered making the most requested recipe from the NY Times, Purple Plum Torte, but I didn't have the proper size pan for it....yet. I bookmarked recipes for Teddie's Apple Cake and half a dozen pasta recipes, but this soup came out of practicality - I had all the ingredients for it in my kitchen already. I'm a simple woman. It's a recipe from Melissa Clark, a lightly pureed lentil soup spiked with a pinch of cayenne pepper and a squeeze of fresh lemon juice, drizzled with a slick of cooling olive oil over the top just before serving, it's perfect for a quick and light dinner on an October weeknight...even if it is 75 degrees outside.


I can't wait to continue working through this book - it's certainly going in my Married Life Arsenal of Things to Cook. Justin - you're welcome.

Red Lentil Soup with Lemon
Adapted from The Essential New York Times Cookbook

3 tablespoons olive oil, more for drizzling
1 large onion, chopped
2 garlic cloves, minced
1 tablespoon tomato paste
1 teaspoon ground cumin
1/4 teaspoon kosher salt, more to taste
1/4 teaspoon ground black pepper
Pinch of ground chili powder or cayenne, more to taste
1 quart chicken or vegetable broth
1 cup red lentils
1 large carrot, peeled and diced
Juice of 1/2 lemon, more to taste
3 tablespoons chopped fresh cilantro (optional)

In a large pot, heat 3 tablespoons oil over high heat until hot and shimmering. Add onion and garlic, and sauté until golden, about 4 minutes.

Stir in tomato paste, cumin, salt, black pepper and chili powder or cayenne, and sauté for 2 minutes longer.

Add broth, 2 cups water, lentils and carrot. Bring to a simmer, then partially cover pot and turn heat to medium-low. Simmer until lentils are soft, about 30 minutes. Taste and add salt if necessary.

Using an immersion or regular blender or a food processor, purée half the soup then add it back to pot. Soup should be somewhat chunky.

Reheat soup if necessary, then stir in lemon juice and cilantro. Serve soup drizzled with good olive oil and dusted lightly with chili powder if desired.

10.25.2010

cranberry orange upside down cake.

This whole bit about a master's degree is really, really cramping my style. You see, I've got a stack of brand spankin' new cookbooks piled up on my desk, their newly minted spines not even cracked, and I can't touch 'em. Not with a ten and a half foot pole.


I get a little weepy thinking about where my priorities have gone - now homework has to be done before I can make a cake. I need to finish reading fifty pages before I even think about that cookie. It's cruel and unusual, and the lack of light at the end of the tunnel is an increasingly large problem. There was a time, back in my glory days, where I could bake every night. Not anymore. [Moment of silence in the name of boring, life-taking responsibility.]


But this weekend, I blew it all off. I left my academic ball and chain in Maryland, high-tailed it to Pennsylvania with my sugar daddy for a weekend of pumpkin pickin', margarita sippin', and maybe a little kissin' at the farm. It's Justin's personal mecca - the open fields, the homemade shooting range, the rows of cornstalks and the hideous turkeys that make crazy noises when you talk to them. Every time we head up there he says, "Don't forget to pack your outside jeans and boots that can get dirty." And every time he gets a blank stare and a simple, "I don't own those things." But I made up for it - I brought this cake.


Bless his heart - I'll never be as country as he hopes, I don't own flannel nor do I have any desire to, that deer head is not going on our living room wall and we're not decking out the entire first floor with leather furniture. I mean, I love him, but no. Just no. [Sorry, baby.]


Okay, seriously, let me tell you about this cake. This cake causes me lots of year-long strife at home, mostly because this is my father's most favorite cake of all time and my sorry excuse of a grocery store only stocks fresh cranberries one month out of the year. They don't even sell them frozen which is quite silly since cranberries love to be frozen, so I have to hear, "Why can't you make that cranberry cake?" all year long. Really, I can't blame him. This cake is delicious.


Here's what you do: make a hot caramel spiked with spicy cinnamon and fresh orange juice, pour it into the bottom of a pan and toss a handful of tart cranberries, crunchy walnuts and sweet orange zest over the top. Make a thick and glossy buttermilk cake batter, smoosh it over the cranberries, lick the batter bowl while you watch it rise in the oven, flip it upside down while it's still piping hot and admire the rosy red exploded berries dotted all over the top, drizzle a quick orange sugar glaze over the cooled cake and whiz-bag! You're welcome.


On a side-note: As we continue to house shop, one of my minimum requirements is a well-lit kitchen. My current baking habitat has the worst lighting and I'm forced to work after hours under fluorescent lights - I'm afraid many of my photos show it. So bear with me, friends, hopefully we'll have some good news soon.

Cranberry Upside-Down Coffee Cake

If your cranberries are frozen, no need to defrost them before making this recipe. If you don’t have a 9-inch round pan, you can also make it in a 9-inch square pan. Without the glaze this cake is fairly tart, but with it, it’s sweet enough to appeal to just about anyone.

Cranberry Walnut Topping:

1 tablespoon all-purpose flour
2 cups fresh cranberries
1/4 cup chopped walnuts
zest of 1 orange

Cake:

1/2 cup (1 stick) butter, softened and divided
1/2 cup packed dark brown sugar
2 tablespoons fresh orange juice
1/4 teaspoon ground cinnamon
1 1/2 cups all-purpose flour
1 teaspoon baking powder
1/2 teaspoon salt
1 cup granulated sugar
1 teaspoon vanilla
1 large egg
1/2 cup buttermilk or regular milk

Glaze:

1 cup powdered sugar
1 teaspoon butter, melted
2 tablespoons fresh orange juice

Preheat oven to 350°F.

Spray a 9-inch round cake pan with cooking spray. Sprinkle in about 1 tablespoon of flour and shake around to evenly coat pan.

In a small bowl, combine cranberries, walnuts, and orange zest. Set aside.

Melt 2 tablespoons of butter in a small saucepan over medium heat. Once melted, add brown sugar, 2 tablespoons of orange juice, and cinnamon. Cook for about 3 minutes, stirring constantly. Remove from heat. Pour sugar mixture into prepared pan and sprinkle evenly with the cranberry mixture. Set aside.

In a medium bowl, whisk together flour, baking powder, and salt.

Place 6 tablespoons of butter and granulated sugar in the bowl of an electric mixer. Beat at medium speed until well combined. Beat in vanilla extract and egg. On low speed, alternate adding flour mixture and buttermilk, starting and ending with flour mixture, until just combined. Spoon the (relatively thick) batter over the cranberry mixture in the prepared pan, and gently spread until even.

Bake 350°F for 45-55 minutes, or until a toothpick inserted in the center comes out clean. (Start checking it after 40 minutes - this cake throws me for a loop. The first time I made it  I wrote down "Bake for 35 minutes" but when I made it again this year it was still goopy in the center at 40 minutes.) Cool in the pan on a wire rack for 5- 10 minutes. Run a knife around the edges, then carefully invert onto a plate or cake stand. Cool completely.

For the glaze, combine sugar, melted butter and orange juice in a small bowl and stir until smooth. Drizzle over cake. Can be made a day ahead and stored, wrapped, at room temperature.

10.21.2010

apple & white cheddar scones.

This week has been a rodeo, and I've been thrown off the horse.


I had high hopes for baking the past ten days or so, but life gets in the way. I hate when that happens. I had a sixty page paper due last week, yes - sixty, then Justin's grandmother passed away so we high-tailed it to Pittsburgh after learning the dream house we put an offer on went to someone else. (Although after the viewing Uncle Bill and Aunt Cindy took us all out to Primanti Bros. for sandwiches and hello, best thing I've eaten in a long, long time.) So yes, it's been a bumpy ride.


But God is faithful and good and in control despite the surrounding madness. I believe that with all my heart. There were a few glimmers of happiness in the past week - we had our engagement pictures taken by an absolutely fabulous photographer and just the sneak peek makes me all teary. She is so talented and I am so blessed to be marrying an amazing man.


You should see the rest of 'em. My police officer is smokin'.


But hey, it's a new day, let's talk about scones! The older I get (and 24 is, like, super old), the more I love scones. I used to be a muffin girl (not in the ill-fitting pants way), but I'd never turn down a crumbly topped cinnamon streusel muffin or a vanilla muffin dotted with blueberries. We all know that muffins are nothing more than bald cupcakes, and that works for me because frosting isn't my favorite thing.


But scones were always sort of foreign to me - there's a lot of bad scone recipes out there: some hard as hockey pucks and others like confused cupcakes, overly sweet and too fluffy. I think a good scone is complicated, sweet and salty, crisp but tender and never the sort of thing to send you into a diabetic coma first thing in the morning. I've given scones their fair share of attention around here, vanilla bean, black raspberry and apricot-walnut, but these just might be my new favorite.


I'm embarrassed to say that I've been sitting on this recipe for a long time. I received the book, The Perfect Finish, for review months ago and it got lost in the shuffle. Even then, I remembered this being the one recipe that really stuck out to me - tart-sweet apples roasted until they're dry on top and sticky underneath matched with sharp, rich cheddar cheese and baked into a lumpy, crusty triangle of a scone. Once you split it open, the cheddar is streaked through the woven crumb with splotches of jammy apple pockets throughout - every bite is a surprise, sometimes cheesy, sometimes apply, always delicious.


Don't be silly like me and wait until next autumn to bake these. Do it soon. October won't be here forever, and these encompass everything happy about the season. Sort of like this.


I ate these this morning with a cup of hot lemon tea, resting the scone over top my mug to warm it just a bit. It's a cheap trick but hey, it's not like I have an oven in my cubicle over here. These are best eaten warm just out of the oven but they will freeze beautifully and need only a gentle reheat in the oven to perk back up.


Apple & White Cheddar Scones
Adapted from The Perfect Finish

2 firm, tart apples, such as Granny Smith, Macoun, or Pippin (about 1 pound total)
1 1/2 cups all-purpose flour, plus additional for work surface
1/4 cup sugar, plus 1 to 1/2 tablespoons for sprinkling
1 1/2 teaspoons baking powder
1/2 teaspoon salt, plus additional for egg wash
6 tablespoons unsalted butter, chilled and cut into 1/2 inch cubes
1/2 cup sharp white Cheddar cheese, shredded
1/4 cup heavy cream
2 large eggs, at room temperature

To make the apple and white Cheddar cheese scones, position a rack in the center of the oven and preheat to 350°F (176°C). Line a baking sheet with parchment paper.

Peel, core, and slice each apple lengthwise into sixteenths. Place the slices in a single layer on the baking sheet. Bake the apples until they take on a little color and feel dry to the touch, about 20 minutes. Transfer the apples to a bowl and let cool. Leave the oven on.

Sift the flour, sugar, baking powder, and salt onto a piece of parchment or waxed paper and set aside.

Place the butter in the bowl of an electric mixer fitted with the paddle attachment. Add the apples, Cheddar cheese, cream, and 1 of the eggs. Sprinkle the flour mixture over the butter mixture and mix on low speed until the dough just comes together. Do not overmix.

Generously flour the work surface, place the scone dough on it, and sift a light layer of flour over the top. Use a rolling pin to gently roll the dough into a 1 1/4 inch thick, 6-inch circle. Cut the circle into 6 wedges (2 1/2 inches wide at their outer edge) and transfer the wedges to the baking sheet, leaving at least 2 inches between each scone.

In a small bowl, beat the remaining egg with a pinch of salt. Brush the apple scones with the egg wash and sprinkle with the remaining 1 1/2 tablespoons of sugar. Bake on the center rack until firm and golden, about 30 minutes. With a spatula, lift the scones onto a wire rack to cool for 10 minutes, then serve warm.

10.12.2010

sweet & salty brownies.

Do you remember last week when I humbly implied that the Olive Oil Cake from Baked was less than stellar? Do you also remember that I mentioned feeling a little gossipy saying so, given my undying allegiance to everything that comes from the ovens of Matt and Renato? You know how gossip always comes back to bite you?


It did. And hard. Matt Lewis, yes this Matt Lewis, left me a comment on that posting. Now, I don't know if it was the real Matt Lewis who found me in the sea of food blogs by some miraculous gesture of the Lord, or if it was a Matt Lewis Impostor sent to remind me that gossip is not okay because you never know who might be listening, but it was enough to turn my face hot pink and my palms sweaty. And I'd be lying if I said I didn't bounce down the stairs and shove the backside of Explorations into my mother's face and shouted, "THIS GUY! THIS GUY RIGHT HERE READS MY STUFF!"  Squeeeeeal.


Either way, Renato's mother now knows I didn't like her bundt cake. I'm sorry, Mrs. Poliafito, it just wasn't there for me. I'm sure you are a very nice lady and you must have good genes since you graced the baking world with Renato, but maybe bundt cakes just aren't your thing.


So, with a little encouragement from the author himself to keep chuggin' along, I gave it another whirl, this time with the Sweet & Salty Brownies. The book says they are famous enough to be noted on the Food Network, but I'm skeptical of FN's polling abilities, so I had to try it out for myself. I absolutely adore the original Baked Brownie in all it's chocolaty glory, and I wasn't sure this one could top it, and it doesn't. I mean that in best way possible. They're not comparable - the original brownie is perfect for picnics, for a mid-afternoon snack. These brownies, with a swoosh of smoky caramel drizzled into the center, a double-whammy of chocolate thanks to both cocoa powder and melted chocolate, and that unmistakable salty flavor from fleur de sel - they're sultry and perfect for those rare occasions you snag a date night with your hunky husband-to-be-police-officer-man. Assuming you even have date nights any more and aren't doing homework on Friday nights. Not that I'm that lame. Umm.


So Baked, just when I think your book can't get any less appetizing you go and do somethin' like this - AND TOTALLY REDEEM YOURSELF! These brownies are a bit more fudgy than the original recipe, and I think they begged for a scoop of vanilla ice cream. Try to resist adding espresso powder to the batter - swat your hand away if you have to, but you want the full flavor of the caramel to come through.


Sweet and Salty Brownies
Adapted from Baked Explorations

For the filling

1 cup sugar
2 tablespoons light corn syrup
1/2 cup heavy cream
1 teaspoon fleur de sel
1/4 cup sour cream

For the brownie

1 1/4 cups all-purpose flour
1 teaspoon salt
2 tablespoons dark unsweetened cocoa powder (I used black cocoa)
11 ounces dark chocolate (60-72%), chopped
2 sticks unsalted butter, cut into cubes
1 1/2 cups sugar
1/2 cup firmly packed light brown sugar
5 large eggs, room temperature
2 teaspoons vanilla extract

For the assembly

1 1/2 teaspoons fleur de sel
1 teaspoon coarse sugar

Make the caramel

In a medium saucepan, combine the sugar and corn syrup with 1/4 cup water, stirring them together carefully so you don't splash the sides of the pan. (This is embarrassing, but in the name of honesty I will confess - I read this and thought, "What idiot would slosh it out of the pan?" Well, the good Lord humbled me not long after when I splashed molten hot sugar onto my foot and in case that's never happened to you, it burns like lava.)  Cook over high heat until an instant-read thermometer reads 350 degrees F, or until the mixture is amber in color, 5-7 minutes. Keep a close eye on it - caramel can go from gorgeous to burnt in a few seconds. Remove from the heat, slowly add the cream (careful, it gurgles and bubbles) and then the fleur de sel. Whisk in the sour cream. Set aside to cool.

Make the brownie

Preheat oven to 350 degrees F.

Butter the sides and bottom of a glass 9 x 13 inch pan. Line the bottom with a sheet of parchment paper and butter the parchment.

In a medium bowl, whisk together the flour, salt, and cocoa powder.

Place the chocolate and butter in the bowl of a double boiler set over a pan of simmering water and stir occasionally until the chocolate and butter are completely melted and combined. Turn off the heat, but keep the bowl over the water of the double boiler, and add both the sugar. Whisk until completely combined and remove the bowl from the pain. The mixture should be at room temperature.

Add three eggs to the chocolate mixture and whisk until just combined. Add the remaining eggs and whisk until just combined. Add the vanilla and stir until combined. Do not overbeat the batter at this stage or your brownies will be cakey.

Sprinkly the flour mixture over the chocolate. Using a spatula, fold the dry ingredients into the wet ingredients until there is just a trace amount of the flour mixture visible.

Assemble the brownies

Pour half of the brownie mixture into the pan and smooth the top with a spatula. Drizzle about 3/4 cup of the caramel sauce over the brownie layer in a zigzag pattern (you will not use all the caramel sauce - resist dumping it all in there or it will creep out to the edges and burn, baby, burn). Use an offset spatula to spread the caramel evenly across the brownie layer. In heaping spoonfuls, scoop the rest of the brownie batter over the caramel layer. Smooth the brownie batter gently to cover the caramel layer. (I had a hard time getting it to cover perfectly and I was afraid it would burn, but it's cooling now and seems to be okay.)

Bake the brownies for 30 minutes, rotating the pan halfway through the baking time and check to make sure they are done by sticking a toothpick into the center of the pan. The brownies are done when a few moist crumbs are stuck to the toothpick.

Remove the brownies from the oven and immediately sprinkle the fleur de sel and coarse sugar over the top.

Cool the brownies completely before cutting and serving. The brownies can be stored, tightly wrapped at room temperature, for up to 4 days.

10.10.2010

cantaloupe granita.

It's confusing outside - the calendar says Autumn but the weather says early Summer and that throws off my culinary instincts and I end up making frozen desserts rather than hot chocolate or mulled cider or apple pie. Basically, I've got a fever and the only prescription is more baking.


This poor cantaloupe has been sitting in the fruit basket for two weeks. In its lifetime, the surrounding neighborhood went from upscale shiny apples and sunshine colored lemons to speckled-black bananas and a butternut squash that will probably see the trash can before dinner. It's been a hard two weeks for that melon. It started to turn soft and that's when you know it's make or break - you either slice it up and eat it, the juice running down your forearms over the sink, or you mumble about what a shame it is to throw out a melon and why did you buy two? (They were on sale.)


Me? I pureed the heck out of it, squeezed in a little lemon juice and scraped-scraped-scraped until it turned into icy flakes of cantaloupey granita.


I've been in a sort of over-stressed state lately where I seem to get a bellyache from nearly everything I eat and this was the perfect remedy of a last of summer hurrah on the grill - it's fresh and smooth, the clean taste of pure melon on your tongue rinses off your tastebuds and, dare I say, carries that cooling sensation you get after you brush your teeth.


I might skip Crest from here on and out and just swish a few forkfuls of granita around my molars and call it a night. I also take brownies to my dentist every time I go for a cleaning, so I doubt even he would be surprised by my latest shenanigans.


If you've never had granita before, you should know that this is not at all like ice cream. Although Justin and I went to a pumpkin patch this weekend that served homemade ice cream being cranked by a steam engine and that was disappointingly icy rather than creamy, that's not the intention of ice cream. Granita is more like a smooth Italian ice but it melts quickly on the tongue so there isn't much crunching required. I hate the sound of crunching ice, it drives me mad when my sister shoves her hand under the ice dispenser and chomps down a handful on her way out the door. [Chills.]


Take advantage of this before all the melons go to pot and we're left with turnips at the grocery store. I trust you'll do the right thing.

Cantaloupe Granita
Adapted from The Perfect Scoop

1 medium-sized melon (cantaloupe or honeydew)
2/3 cup granulated sugar
1 teaspoon freshly squeezed lemon or lime juice
1/4 cup water
Pinch of salt

Peel the melon, split it in half, and scoop out the seeds. Cut the melon into chunks and puree in a blender or food processor with the sugar, citrus juice, water, and salt. (You should know that as I write this, I realized I forgot to add the water but it still turned out fine. I've never made/had granita before so I don't have anything to compare it to, but it was delicious.)

Pour the mixture into a plastic container about 8 x 12 inches and with at least a 2 quart capacity. Freeze the container, uncovered, for 1 hour. After an hour, it should start to freeze around the edges. Take a fork and scrape the mixture toward the center, breaking up the larger bits.

Return the dish to the freezer, then check the mixture every 30 minutes afterward, stirring each time and break up any large chunks into small pieces with a fork until you have fine crystals of homemade granita. If at anytime it freezes too hard, leave it out at room temperature for a few minutes until it is soft enough to be stirred again.

Serve with whipped cream or straight up. Make enough for 4.

10.08.2010

olive oil orange bundt cake.

I feel a little gossipy saying this, as if I'm talking smack about a good friend behind her back after she did me wrong, but I am not all that impressed with my latest cookbook purchase. Considering that a dozen recipes on this blog hail from said book's predecessor, New Frontiers in Baking, I had ambitious hopes for the follow up, Baked Explorations.


When I first purchased Frontiers, I couldn't put it down. Even a year after it came into my possession, after I'd already baked half the recipes in the book, I still kept it on my night stand in case I woke up with a late-night craving so I could lick the pages. I still make that original recipe for granola every week for my breakfast (and for Justin, he adores it) and it's still my go-to book for delicious desserts with flair. But this second one, Explorations, I'm not so sure about this one.


I jumped right in with malted milk sandwich cookies, and they were good in their own way, but they didn't pack the punch I've come to expect from the recipes cranked out at Baked. I found that with each chapter, I lost a little excitement, a little more steam, and by the time I got to the recipe for Strawberry Jell-O Pretzel Salad, I thought about returning it. Seriously, Jell-O salad!? I had that one time at my Aunt Trish's bridal shower 15 years ago and I remember looking at it, poking it with my fork, wondering if I should eat something so foreign. I went for it, only because I was already wearing a wedding dress made of toilet paper and feeling a little crazy.


I haven't totally tossed in the towel, there is still a recipe for homemade doughnuts that I want to try, especially since half my paycheck has gone to Krispy Kreme the past few weeks to feed my sick, deranged need to eat as many blueberry cake doughnuts as I can stuff into my cheeks, but anything beyond the breakfast section of this book sort of loses my attention. Luckily for this cake, it was in the breakfast section, and cake for breakfast is always okay with me.


I've seen similar recipes floating around in the past few years for similar cakes - some with almonds, others with lemon zest instead of orange or a mixture of both, some formed into little cakies and others as a full bundt, but the concept is the same - a golden, olive oil batter punched up with a little citrus zest for good measure and nothing beyond a sprinkling of powdered sugar for a crown. I'm not sure why I put it off for so long, maybe because the first version I saw of it was from Giada and I try not to endorse her and her extra-small shirts whenever possible, or if the idea of olive oil in a dessert was too strange for me to latch onto, but here it is, however late in the game.


This cake is just....okay. It's not terribly moist, not dry, but you certainly need a cup of tea to swish it all down. I used tangerines instead of oranges because that's what was in the fruit basket, so perhaps that was my own mistake, but the citrusy zap I was hoping for wasn't there. To top it all off, I hosed that pan down with cooking spray and half the top was still ripped off when I tipped it out of the pan. Fail.


This cake isn't bad, but I have an inkling there are betters out there, I'll be on the prowl.

Olive Oil Orange Bundt Cake
Adapted from Baked: Explorations

3 cups all purpose flour
1 tablespoon baking powder
1/2 teaspoon salt
4 large eggs, separated
2 cups granulated sugar
1 cup plain yogurt
3/4 cup extra-virgin olive oil
Freshly grated zest of 2 oranges
2 teaspoons vanilla extract
1/4 cup confectioners' sugar, sifted, for dusting

Preheat the oven to 350 degrees F. Generously spray the inside of a 10-inch Bundt pan with nonstick cooking spray and flour. (The original recipe doesn't say you must flour it if you use non-stick spray, but since my cake is no decapitated, you probably should.)

In a large bowl, whisk together the flour, baking powder and salt. Set aside.

In the bowl of a standing mixer fitted with the paddle attachment, beat the egg yolks until they are pale and light; slowly pour in the sugar until it is completely incorporated. Add the yogurt and olive oil and mix until thoroughly combined. Add the orange zest and vanilla, and mix until just incorporated.

Add the flour mixture to the wet ingredients in two parts, beating after each addition until just combined. Scrape down the bowl and beat again for 5 seconds.

In another large bowl, beat the egg whites until stiff peaks form. Scoop 1 cup of the egg whites into the batter. Use a rubber spatula to gently fold them in. After about 30 seconds of folding, add the remaining egg whites and gently fold until they are almost completely combined. Do not rush the folding process - you should "gently fold" until you think your arm may fall off, then it's ready.

Pour the batter into the prepared pan and bake for 40-50 minutes, rotating the pan halfway through the baking time, or until a small sharp knife inserted into the cake comes out clean. Transger the pan to a wire rack to cool completely. Gently loosen the sides of the cake from the pan and turn it out onto the rack.

Just before serving, dust with confectioners' sugar.

This cake can be stored at room temperature, covered tightly, for up to 3 days.

10.04.2010

malted milk sandwich cookies.

I finally had the dream I've been expecting for weeks and weeks now, ever since my life went from pretty busy to really freaking busy. The dream where you've forgotten to do everything and you're behind on all your responsiblities and you wake up in a cold sweat frantically searching for your planner. I dreamed that I came in to work and there was a line of people outside my cubicle all frowning at me and demanding to know why I hadn't done this or that yet; then Justin called me and said he moved the wedding up to the day after Christmas and insisted it was still doable. Strangely enough, my next concern was not if we could still get lilies at that time but rather if we would be spending Christmas day together or not since we technically weren't married yet.


And no frantic dream would be complete without showing up to class unprepared and having everyone laugh at me over how lousy my required 120-page movie script is as if it doesn't cause me enough strife already! (Breathing into a paper bag.) So I layed in bed, furious as ever that it's pouring rain on a Monday morning again and I still have to get up and go to work where said line of people wait outside my cube, running over all the other things that are piling up on my plate. I thought about where Justin and I will live, what time we need to leave for our engagement pictures, why he hates those gorgeous Alice in Wonderland cereal bowls I picked out in the district last week when something nudged into my little head that hasn't in a while.

I didn't pray.


I always pray in the morning, usually in that place between sleep and awake as Tinkerbell would say, where my face is still scrunched from sleep and I'm not really awake yet but when I finally come to I realize I've been chattering away to God in my head for a few minutes now and that's the best way to start the day. But instead of prayers this morning it was a random jumble of useless thoughts and I forgot for a while there that God is not at all impressed with my busyness and if anything I am now less capable of handling it all for not taking time to rest.

It's incredible how I've learned this lesson a thousand times over and it's just a fresh the next time I get it. Sheesh.


I've been craving some liturgy lately (I know, not a food, but stay with me here, Jimbo) and it delights Friar Matt to no end as we've been bickering over the merits of Calvin and St. Francis and Augustine for many years now, but as a dedicated Protestant it's been very awkward and funny feeling but I'm going forward with it anyway. Because as much as I deny it, as much as the bulk of my personality begs to fly and be free, I like a little structure every now and again. So Friar Matt sent me a book, the Shorter Book of Christian Prayer, which, as I understand it, is a condensed version of a larger set of prayers that he offers up every day.


I used to be adamently against pre-written prayers for fear they would be canned and thoughtless and I didn't like the idea of someone else putting words into my mouth, and at some level I think I still might be, but after swallowing up two Lauren Winner books in a few short weeks, my interest in liturgy is at an all time high. There's a certain unity to it, the communion of thousands having said that prayer before me, I can't help but lean toward it. So I am. And I know I am softening to it because I watched Justin's friend and his tiny son be baptized this weekend in a Lutheran church and I was teary the whole time thinking about how many others have been baptized from that bowl.

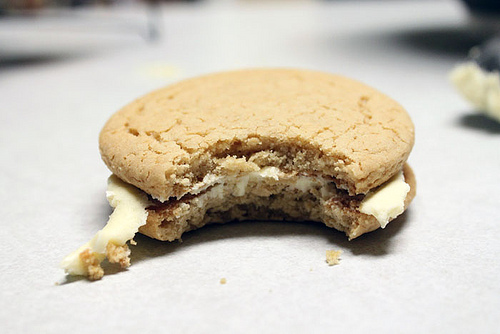
These cookies are my attempt to convince the Church that communion wafers should be made of malted milk cookies instead of the Styrofoam-esque nibs they pass out nowadays.

Just kidding.


These cookies - a toasty, buttery wafer cookie, chewy with malted milk powder with that unmistakable taste of an old fashioned soda fountain with a dollop of cream filling smooshed in between - are a good way to break open your new Baked NYC cookbook. They're also a good thing to send to your friar friend who is learning how to cook all sorts of good things like tomato sauce with pasta but is a little lost in the dessert department.

Malted Milk Sandwich Cookies
Adapted from Baked Explorations

For the cookies

4 cups all purpose flour
3/4 cup malted milk powder
2 teaspoons baking powder
1/2 teaspoon baking soda
1/2 teaspoon salt
2 sticks unsalted butter, at room temperature
1 cup firmly packed dark brown sugar
1 cup granulated sugar
2 eggs
1/2 cup sour cream
2 teaspoons vanilla extract

For the vanilla filling

5 ounces vegetable shortening, at room temperature
1/2 stick unsalted butter, cut into cubes, at room temperature
3 1/4 cups confectioner's sugar, sifted
1/2 teaspoon salt
1 tablespoon vanilla extract
1 teaspoon light rum (optional)

Make the cookie dough

In a large bowl, whisk together the flour, malt, baking powder, baking soda, and salt. Set aside.

In the bowl of a standing mixer fitted with the paddle attachment, beat the butter and sugars together until light and fluffy. Scrape down the bowl and add the eggs, one at a time, beating until each is incorporated. Add the sour cream and vanilla and beat until just incorporated. Add half of the dry ingredients all at once and beat for 15 seconds. Again, scrape down the bowl, then add the remaining dry ingredients and beat until just incorporated. The mixture should come together almost in a ball. (This didn't happen for me, it stuck together when pressed, but not on its own.)

Loosely shape the dough into two balls, wrap them tightly in plastic wrap, and refrigerate for at least 3 hours or overnight.

Preheat the oven to 350 degrees F. Line two baking sheets with parchment paper.

Divide each dough ball in half, to make four portions. Place on portion on a lightly floured work surface and return the other three portions to the refrigerator.

Roll out the dough to about 1/4 inch thickness. The dough will be sticky, so you may have to flip and lightly flour it a few times while you work. Use a 2-inch round cookies cutter (or the top of a drinking glass if you're without one, I did) to create the sandwich tops and bottoms, transfer them to the prepared baking sheets, leaving about 1 inch of space around each cookie. Extra dough scraps can be refrigerated and re-rolled, if desired.

Bake the cookies for 10-12 minutes or until they are slightly browned. (12 minutes for a crispy cookie, 9-10 minutes for a chewy one.) Allow the cookies to cool on the pan for a few minutes before transferring to a wire rack to cool completely.

While the cookies cool, make the vanilla filling.

Make the filling

In the bowl of a stand mixer, beat the shortening and butter until lump-free and smooth. Add the sugar in three parts mixing after each addition. Add the salt, vanilla and rum, if you're using it, and beat for 10 seconds. The filling should be thick but spreadable. You can add a few drops of water here and there if it's too thick.

Using a small spoon or a 2-tablespoon cookie scoop, spoon the filling onto the flat side of one cookie. Place another cookie, flat side down, on top and press down slightly so the filling spreads to the edges of the cookie.

Makes about 25 sandwiches, give or take a few, and will keep at room temperature for about 3 days.